Thursday, June 23, 2011

Avoid Caching Issues While Development

Browser caching can become a nightmare when developing web applications, as most of the changes what we make in the code may not get reflected at the browser end, which might end up missing the set time frame for that specific task; the reason being caching of contents at the browser level or at the proxy level. 

The problem with browser caching can be sorted out through use of a new feature built-in to modern browsers known "InPrivate Browsing" (in IE) and "Incognito window" (in Chrome). The feature presents you with a session (a new window) which is completely free from all sorts of saved cookie info and content cache. The beauty of this mode is that, what ever browsing you do here wont even leave a trace of those activities in the browser history nor in the cookie container or in the browser cache. 

If you had done Ribbon UI development in SharePoint 2010 before, then definitely you must have faced the dilemma of caching, as what ever changes you made to the Ribbon bar won't get reflected at the browser end as the XML required to render the Ribbon UI is cached. Myself being faced with the dilemma of caching with other development tasks and now in SharePoint, I had decided to go for the aforesaid "Isolated Mode" (as I wish to call it) as its going to eliminate the issues associated with web browser caching.

So next time don't forget to utilize this pretty cool feature packaged with almost all browsers available out there in the net.

Wednesday, June 22, 2011

Installing SharePoint 2010 on Window 7 64-bit

With the release of SharePoint 2010 the good news is that, for development one can develop SharePoint solutions on a Client OS like Windows 7 (64-bit) instead of using a Server OS like Windows Server 2008 (64-bit). With this corporations can save on licensing costs by tapping in existing investments made for client operating systems like Windows 7 or Windows Vista. But this was not the case with SharePoint 2007, which required a server OS like Windows Server 2003 to get it running even for development, though there were some hacks to get MOSS running on a client OS like vista, it wasn't adopted by the development community at large, because of fear of issues\conflicts which might crop up at a later time.

Hearing this I tried to get SP 2010 installed on to my Windows 7 which failed in the first step itself, so if you are among the many developers or System Admin's who received the following error "Setup is unable to proceed due to the following error(s): This product requires Windows Server 2008 Service Pack 2 or above. Correct the issue(s) listed above and re-run setup." while trying to install SharePoint 2010 on Windows 7 (64-bit), then here's an elegant solution by Sandrino Di Mattia, who had posted an excellent article on how to tide over this error.


The reason behind this error is due to the fact that, SharePoint 2010 on production environments is always supposed to be run on Windows Server 2008 (64-bit).

Monday, June 20, 2011

Nexus between State Service and Chart Web Part in SharePoint 2010

While trying to display a simple bar chart in SharePoint 2010 from data contained in a Sales list, I ended up with the following error "The chart cannot be rendered. This may be due to a misconfiguration of the Microsoft SharePoint Server State Service. For more information, contact your server administrator."

If you are new to charts in SharePoint 2010 then no need to concern, as much of the overhead of is taken care of by SharePoint itself. For the developer its all about adding a "Chart Web Part" to  a page and assigning properties like linking to data source, selecting the chart of your choice and setting the appropriate titles and legends, that's it. Once you are done with all those properties, you will see the chart beautifully rendered on your page. The only drawback I came to find with inbuilt charts are that  they aren't that interactive when compared with a Silverlight charts, where with the later one could rotate, drill down, click certain portions to view more details and moreover a some rich 3D rendering like that. The built-in SharePoint Chart fits the bill for most usual business requirements.

Searching for the Service:
So coming back to the error which I was talking about. From the error message what I could infer was that "SharePoint State Service" wasn't available or running. I started to lookup for this service under Windows Services (services.msc) but didn't find any. Next I moved on to "SharePoint Central Admin"  where I navigated to "Application Management -> Manage Service Applications" there too the service wasn't listed. So seems like the service wasn't installed during farm configuration phase. 

Solution:
Now we are going to install the "State Service" (which itself is a Service Application in SP2010). 
  1. For this navigate to "SharePoint Central Admin -> Configuration Wizards -> Launch the Farm Configuration Wizard -> Click 'Start the Wizard' ". In next screen uncheck all the services except "State Service" (Note: Before unchecking other services, make sure you are not using any of those services in your project(s). Leaving every services checked, will make your SharePoint server crawl, running all of these services in a single server will consume more CPU cycles and memory. Normally in a production environment, each of these services will be running in different servers so as to offload the overhead from the WFE(Web Front End) SharePoint server.)
  2. Click OK and browse back to Central Admin (no need to continue with a new site creation).
  3. In the Central Admin page select "System Settings -> Manage Services on this Server" and search for the Service Application with named "State Service" and click the "Next" button , after which the status should be shown as "Started".
This error will show up not only for charts, but also when  trying to publish a page in SharePoint 2010. So going back to the page where I had placed the Chart Web Part. Hurray the chart was rendered as expected without any errors.  

Breeze through SQL Server Management Studio

If you are among the many developers who frequently use SQL Server Management Studio for tasks like writing Stored Proc's, complex queries, views etc, then definitely you will find yourself writing SELECT statements to get a view of data inside tables and views. The next possible statement you might frequently use should be the sp_helptext to view definitions of   user-defined rules,  unencrypted Transact-SQL stored procedures, user-defined Transact-SQL functions, triggers, computed columns, CHECK constraints, views etc.

A small analysis on the count of SELECT or sp_helptext statements issued to view the data or the schema of an Stored Proc\View. I came to find that on an average it was around  30 plus. I got this from SQL Profiler after excluding those statements issued from my application. Before I came to find a solution for this, I kept a copy of frequently used functions so as to copy and paste whenever I need any of those, that's how I was doing before embracing this cool elegant solution. 


I would call myself a lazy programmer, yes you read it right "A lazy programmer, but definitely not a lousy one". Being lazy, I always wanted to get more from little. So from a developer point of view this means, more productivity\output from less keystrokes and writing scripts for those little repetitive tasks like changing IE proxy, Hibernating\Shutting down windows, enabling USB ports (hope you know where this specifically applies to), Recovering  crashed desktops and the list goes on and on.

Here I am going to pull yourself into my lazy programmer band wagon(i.e. more productivity from less keystrokes) while working with SQL Server Management Studio. Before moving on, have you ever used the shortcut "Alt + F1" to view metadata for the selected table name? If yes, you had knowingly or unknowingly used the feature on what we are about to explore.


The solutions I am about to show you are in-built to the editor, so no need to worry about shelling out your  hard earned money nor impress your manager for getting budget allocation to get those new tools. Here you will see a pretty awesome feature called "Keyboard shortcuts" built-in with SQL Server Management studio to get this done. So lets move on to the solution part. 

Fire up your "SQL Server Management Studio" and select "Tools -> Options" from the menu.


In the "Options" widow select Environment then select "Keyboard" which should get you to a screen something like the one below(BTW I am using SQL Server 2008 R2). Here you could find three predefined shortcuts already assigned for the key combinations like Alt+F1, Ctrl+1 and Ctrl+2 this means all those three shortcuts are already taken out by MSFT guys, but we still have a lot many key combinations left out there with ready to occupy boards hanging all over them (that means, those shortcuts with no text in the second column).


Lets start filling up those unoccupied slots with our own set of SQL arsenals. To get the job done, you need to copy the statements(highlighted in green) excluding the quotes to the second column (named Stored Procedure).


Ctrl + 3  'SELECT * FROM ' (make sure there's a single space after the FROM keyword and no quotes before and after)


Ctrl + 4 'sp_helptext '  (make sure there's a single space after the FROM keyword and no quotes before and after)

Click "OK" button and exit the editor. 


Now its time to see those new shortcuts in action. 
  1. Fire up the SQL Server Mgmt Studio and open a new query window. 
  2. In the toolbar change to the database of your choice. 
  3. Key in a table name to the query window and select(highlight by selecting the table name) the table name you had just entered.
  4. Press the key combination Ctrl + 3 and you should see all the records in that table getting listed in the results window. If any errors are there make sure you had put a space after the "FROM" keyword and no quotes before and after while entering in the keyboard shortcuts window.
  5. So we had successfully saved ourselves from repeatedly typing "SELECT * FROM" each time to view records inside a table.
  6. Next we will try out the other key combination Ctrl + 4. For this enter a stored proc name to the query window and select the SP name and press Ctrl + 4. You should be seeing the body of the SP, i.e SP definition including parameters and all the t-sql code contained in the SP. In case if the output is displayed in a datagrid(which is the default behavior), you can switch to text view by pressing Ctrl + T and re-issuing the Ctrl+4 shortcut. This time you should be seeing the output like in a text editor. To switch back to grid view press Ctrl +D
So I am leaving out the other shortcuts for you to fill in with the most common statements of your choice. So next time onwards the new keyboard shortcuts should do all the magic for you without the need to keyin SELECT or sp_helptext statements and also start getting used to the  Lazy Programmer experience.  


Tuesday, June 14, 2011

Things To Look Out For While Developing SharePoint 2010 Server Applications

As part of mastering SharePoint Server 2010, I was trying out a simple console application which utilize's SharePoint Server side API's to communicate with SharePoint Server 2010. The console application which I was developing was programmed to fetch all the Lists in a given site collection and display their names(Titles), a pretty simple app.

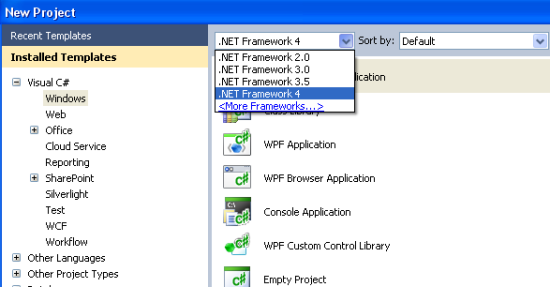
For this I created a new console application in VS.NET 2010 by selecting ".NET Framework 3.5" from the drop down located in "New Project" window.


After which I added a reference to "Microsoft.Sharepoint.dll", which can be found under ".NET" tab of "Add Reference" window(to get here right-clicking "References" folder in solution explorer and select 'Add Reference' from the context menu).

Thereafter I updated the "Main" method with the following code, which does fetch all the SharePoint Lists in the default site collection available under "http://SP2010" (this URL refers to my default SharePoint site collection on my machine)

string SiteURL = "http://sp2010";

using (SPSite myspsitecollection = new SPSite(SiteURL))
{
  using (SPWeb mySPSite = myspsitecollection.RootWeb)
  {
    Console.WriteLine(mySPSite.Title);
    foreach (SPList list in mySPSite.Lists)
    {
       Console.WriteLine(list.Title);
    }
  }
}

The compilation went well without any glitches. The moment I ran this application, I got an error message stating that, the console app couldn't find the site. The exact error message was "The Web application at http://sp2010 could not be found. Verify that you have typed the URL correctly. If the URL should be serving existing content, the system administrator may need to add a new request URL mapping to the intended application". 


I was wondering why on earth my console application can't find this site. At the same time all other apps like SharePoint Designer and SM2 (SharePoint Manager 2, a third party utility) all of which were able to successfully connect to my site from the same machine. It was really embarrassing situation trying to troubleshoot like, why only my application wasn't able to establish the link. To get my console app on track, I tried disabling  the firewall and IDS, rechecked the code, installed Fiddler to monitor the requests to the web server etc, but nothing turned out to be providing hint of any sort to the root cause of this scary bug. As last resort I thought of searching for this error on the internet. After going through a couple of links, I came to hit the bulls-eye, finally got the culprit.

Solution:
The error was because of a default setting in VS.NET 2010. Whenever you create a new project in VS.NET 2010 the project by default sets the "Target Platform" to x86. So if you are developing Sharepoint Server side solutions, always make sure that you set the "Platform Target" value to "x64", else you will be getting weird errors, like the one I got. After updating my  console applications "Platform Target" to x64 things went smoothly as expected, listing out the titles of all the Lists in the given SharePoint site collection.


So to summarize; while developing server side apps for SharePoint 2010 make sure you follow these steps without fail.
  1. Always select ".NET Framework 3.5" from the drop down while creating new project. This applies to both Server Site app and Client side apps.
  2. Update the "Platform Target" value to x64, as SharePoint 2010 is 64-bit product.
  3. Refer "Microsoft.SharePoint.dll"
  4. Make sure you are able to connect to the Sharepoint site by specifying the url in Sharepoint Designer. If not make sure that no firewall policies are preventing you from connecting to sharepoint server.
  5. Your application will be running under the same login credentials with which you had logged into the system.


Happy SharePoint development.

Monday, June 13, 2011

How to secure your personal computer

Having heard this query countless number of times from my friends and colleagues, usually these queries pops up only whenever their systems gets infected or when they detects some unusual activity in the system. I thought of documenting the process which usually I follow to keep my system secure. I would also like to mention two principles before moving on to the solution part.

Principle 1: Truth to be told on fundamental aspect of every security system developed by the human race is that, there no such thing as 100% secure or fool proof product\solution. Whenever you hear about a highly sophisticated secure product or solution, it merely means that, those who designed\developed had made the product\solution rugged enough so that, it takes a considerable amount of Skill(Knowledge), Infrastructure, Time, Money and patience to punch a hole in whatever they had come up with. So this doesn't mean that one should avoid security products\solutions at all. Security solutions\products will always evolve and fortify itself from whatever they had learnt from the past. My advice is, while choosing or implementing products and solutions first asses how sensitive is the core system you are planning to secure is. Most of the time you will be find yourself implementing a layered security approach with security products\solutions are different levels.

Principle 2: How to secure you personal computer economically. Yes you read it right "economically". The term "economically" is significant in the context of securing personal computers, as I had seen corporate workstations and laptops fortified with all sort of expensive intrusion detection systems, firewalls, software updates to protect from known virus and vulnerabilities (even then I had seen systems going down or infected, which  is a different story). If you do a simple analysis on how much a person invests in terms of money or time to secure his\her personal computer, you will find it at zero in most of the cases. No one ever wants to spend money on security, but whenever their system gets compromised because of virus or backdoor attacks chances are, they might loose all the valuable data or the data might fall into the wrong hands, which is going to keep you running from pillar to post from law enforcement agencies to banks et al. In worst case scenario you even might not be aware of, that your system was compromised, which could put yourself into much bigger trouble.


Lets start off with securing your personal computer. Before moving on, make sure you meet the following prerequisites.
  1. You are using Microsoft windows XP or above (Vista, Win7).
  2. You have an internet connection (optional)
  3. You have administrator privileges and physical access to your machine.
  4. Never try this steps on your corporate machine, as it may violate your company IT policy.
Here we go:
  1. Never login to you system as an administrator(or a user with admin privileges), unless there is  something that specifically demands you to login with administrator privilege. Never think of this for tasks like installation\un-installation of applications or starting\stopping services etc, all these could be accomplished without logging in as administrator. Here's how
    1. Installing Apps - Right-click the setup file and select "Run as" from the context menu. Provide the administrator username and password to start the installation.
    2. Un-Installaing Apps - Go to system32 folder(type "system32" in you Run dialog), find the file named "Appwiz.cpl". Right-click the file and select "Run as" from the context menu, provide admin username and password.
    3. Start\Stop Service (WinXP) - Go to system32 folder, search for the file named "mmc.exe". Right-click the file and select "Run as" then provide the admin username and password. Once the MMC window opens up, select File->Open from the menu and look for the file name "services.msc" (located in system32 folder)
    4. Start\Stop Service (Vista\Win7) - Go to system32 folder, search for the file named "services.msc". Right-click the file and select "Run as" then provide the admin username and password. 
    5. Run a custom executable under admin privilege - Right-click the executable and select "Run as" then provide the admin username and password.
  2. Always create a normal user account and use this account to login for executing your day to day tasks like browsing, emailing, office apps etc. This helps to limit or nullify virus\worms from infecting, spreading or altering your system and files.
There is still lot many steps to be included, to get your system secure. I will be updating this article when time allows.

Thursday, June 9, 2011

Deploying sandbox solutions in Sharepoint 2010 from VS.NET

Today I was trying my hands on Sandbox solutions, which is a new feature introduced with SharePoint 2010. While going though the exercise, on how to develop and deploy sandbox solution's. I hit the wall while trying to deploy a webpart from VS.NET 2010 as sandbox solution. The webpart (a non-visual\Standard one)  which I was developing was a pretty simple one which does some basic arithmetic operations.  

If you are new to SharePoint, let me explain some some basics on what Sharepoint Sandbox solutions are all about. In a nutshell deploying solutions as sandbox-ed means
  1. The solution run in a separate worker process called SPUCWorkerProcess.exe (Sandbox Worker Process) that isolates the solution from other content\apps. Running solutions in SPUCWorkerProcess.exe process means code in a given sandbox solution can only affect the site collection to which you had deployed the solution to. Usually farm level solutions are hosted in the IIS worker process (w3wp.exe) which does have access to all farm resources.
  2. The solution will be deployed to Solution Gallery, instead of GAC. (GAC is the location where usually farm level solutions get deployed).
  3. The solution will have only limited access to SharePoint Object Model.
  4. The solution won't have access to any external resources outside the farm.
  5. The solution won't have access to the disk nor execute unmanaged code. 
  6. The solution won't have access to resources in a different site collection. 
  7. You can deploy code from other sources(if not tested or reviewed preoperly) without fear of jeopardizing your SharePoint farm.
  8. You can deploy Webparts, List Definitions or ContentTypes even without having elevated privileges like farm admin.
  9. You can develop solutions for SharePoint Online (the cloud version),  then this would be the best way to deploying solutions to the cloud.
The downside with sandbox solutions especially with webparts are that, it only supports non-visual webparts i.e. you had to code all the controls in UI including layout through code, no drag  n drop. Feels intimidating?  Yes I too felt the same thing. So while going through some articles on sandbox solutions, I came to stumble upon an article, which was discussing about deploying visual webparts as sandbox solutions. Wow that's great!!! this was definitely something different from what Microsoft guys were preaching from. Reading further, the article provided a link to  Codeplex which could circumvent the problem of deploying Visual webparts as sandbox solutions to Sharepoint. As I was busy with the problem in hand, I didn't peek into that, may be I will look into that at a latter date.

Now coming back to what I was trying to resolve. My trivial nonvisual webpart was ready and the build went smoothly without errors. Now its time to be deploy my webpart to SharePoint; for that, I selected "Deploy" option from the Build menu. Boom!!! now errors started popping in, which I didn't get hold of what exactly they were. 

The initial error was "Error occurred in deployment step 'Retract Solution': Cannot start service SPUserCodeV4 on computer." Seems like some service which Sharepoint was expecting is down at the moment. After going through the windows services (services.msc), I came to find that the following service "Microsoft SharePoint Foundation User Code Service" wasn't running. I started it and changed its "Startup Type" to "Automatic". Coming back to VS.NET 2010, I issued the "Deploy" command. This time another error popped in.

This time the error was  "Error occurred in deployment step 'Activate Features': This feature cannot be activated at this time. The contents of the feature's solution requires the Solution Sandbox service to be running." Oh God, Sharepoint is expecting another service, which unfortunately is down. I started searching for this specific name "Solution Sandbox service" under windows service's, but couldn't find any exact or near by match. Next I started my search in Sharepoint Central Admin, where I navigated to "System settings" -> "Manage services on this server". Here in "Manage Services" page, lot many services were listed which did include the one I was looking for, i.e. the "Microsoft SharePoint Foundation Sandboxed Code Service".  After starting this service, I issued the "Deploy" command from VS.NET. Finally this time everything went well and the webpart got successfully deployed to Sharepoint site as  sandbox-ed solution. 


I was curious on why MSFT chaps disabled these services, which is so crucial to deploy sanbox-ed solution. While trying to unravel the reason behind this, I came across an MSDN article, which clearly mentioned the reason why it was so. The articles reads, these services were deliberately disabled on performance grounds. Starting these services will kick in three new processes, namely User Code Service (SPUCHostService.exe), Sandbox Worker Process (SPUCWorkerProcess.exe) and Sandbox Worker Process Proxy (SPUCWorkerProcessProxy.exe) which slightly affects server performance. So as to gain the performance advantage only they did disable these services.

Make sure that you DON'T stop or disable the above two services once you deploy a sandbox-ed solution to a sharepoint site as these services are crucial for the sandbox-ed solutions to function properly without which, it would fail.


You could view all sandbox-ed solution inside a site collection by navigating to(at your top level SharePoint site)  
  1. Site Actions - > Site Settings 
  2. Under galleries section click solutions. You should now see the Sandboxed solutions available in the solutions gallery.
Here I was talking on deploying Standard Webparts as sandboxed solutions. Sharepoint doesn't restrict itself to webparts when comming to sandboxed solutions, as you could deploy 'Event Receivers', 'Feature Receivers', 'Custom Worlflow activies' and 'Infopath Biz Logic' as well.


So the crux of using Sandbox solutions is that, you could easily port your webparts to SharePoint Cloud version (online version) with ease and moreover the site collection administrator himself\herself could deploy solutions without raising a ticket to the farm administrator.