Monday, June 13, 2011

How to secure your personal computer

Having heard this query countless number of times from my friends and colleagues, usually these queries pops up only whenever their systems gets infected or when they detects some unusual activity in the system. I thought of documenting the process which usually I follow to keep my system secure. I would also like to mention two principles before moving on to the solution part.

Principle 1: Truth to be told on fundamental aspect of every security system developed by the human race is that, there no such thing as 100% secure or fool proof product\solution. Whenever you hear about a highly sophisticated secure product or solution, it merely means that, those who designed\developed had made the product\solution rugged enough so that, it takes a considerable amount of Skill(Knowledge), Infrastructure, Time, Money and patience to punch a hole in whatever they had come up with. So this doesn't mean that one should avoid security products\solutions at all. Security solutions\products will always evolve and fortify itself from whatever they had learnt from the past. My advice is, while choosing or implementing products and solutions first asses how sensitive is the core system you are planning to secure is. Most of the time you will be find yourself implementing a layered security approach with security products\solutions are different levels.

Principle 2: How to secure you personal computer economically. Yes you read it right "economically". The term "economically" is significant in the context of securing personal computers, as I had seen corporate workstations and laptops fortified with all sort of expensive intrusion detection systems, firewalls, software updates to protect from known virus and vulnerabilities (even then I had seen systems going down or infected, which  is a different story). If you do a simple analysis on how much a person invests in terms of money or time to secure his\her personal computer, you will find it at zero in most of the cases. No one ever wants to spend money on security, but whenever their system gets compromised because of virus or backdoor attacks chances are, they might loose all the valuable data or the data might fall into the wrong hands, which is going to keep you running from pillar to post from law enforcement agencies to banks et al. In worst case scenario you even might not be aware of, that your system was compromised, which could put yourself into much bigger trouble.


Lets start off with securing your personal computer. Before moving on, make sure you meet the following prerequisites.
  1. You are using Microsoft windows XP or above (Vista, Win7).
  2. You have an internet connection (optional)
  3. You have administrator privileges and physical access to your machine.
  4. Never try this steps on your corporate machine, as it may violate your company IT policy.
Here we go:
  1. Never login to you system as an administrator(or a user with admin privileges), unless there is  something that specifically demands you to login with administrator privilege. Never think of this for tasks like installation\un-installation of applications or starting\stopping services etc, all these could be accomplished without logging in as administrator. Here's how
    1. Installing Apps - Right-click the setup file and select "Run as" from the context menu. Provide the administrator username and password to start the installation.
    2. Un-Installaing Apps - Go to system32 folder(type "system32" in you Run dialog), find the file named "Appwiz.cpl". Right-click the file and select "Run as" from the context menu, provide admin username and password.
    3. Start\Stop Service (WinXP) - Go to system32 folder, search for the file named "mmc.exe". Right-click the file and select "Run as" then provide the admin username and password. Once the MMC window opens up, select File->Open from the menu and look for the file name "services.msc" (located in system32 folder)
    4. Start\Stop Service (Vista\Win7) - Go to system32 folder, search for the file named "services.msc". Right-click the file and select "Run as" then provide the admin username and password. 
    5. Run a custom executable under admin privilege - Right-click the executable and select "Run as" then provide the admin username and password.
  2. Always create a normal user account and use this account to login for executing your day to day tasks like browsing, emailing, office apps etc. This helps to limit or nullify virus\worms from infecting, spreading or altering your system and files.
There is still lot many steps to be included, to get your system secure. I will be updating this article when time allows.

Thursday, June 9, 2011

Deploying sandbox solutions in Sharepoint 2010 from VS.NET

Today I was trying my hands on Sandbox solutions, which is a new feature introduced with SharePoint 2010. While going though the exercise, on how to develop and deploy sandbox solution's. I hit the wall while trying to deploy a webpart from VS.NET 2010 as sandbox solution. The webpart (a non-visual\Standard one)  which I was developing was a pretty simple one which does some basic arithmetic operations.  

If you are new to SharePoint, let me explain some some basics on what Sharepoint Sandbox solutions are all about. In a nutshell deploying solutions as sandbox-ed means
  1. The solution run in a separate worker process called SPUCWorkerProcess.exe (Sandbox Worker Process) that isolates the solution from other content\apps. Running solutions in SPUCWorkerProcess.exe process means code in a given sandbox solution can only affect the site collection to which you had deployed the solution to. Usually farm level solutions are hosted in the IIS worker process (w3wp.exe) which does have access to all farm resources.
  2. The solution will be deployed to Solution Gallery, instead of GAC. (GAC is the location where usually farm level solutions get deployed).
  3. The solution will have only limited access to SharePoint Object Model.
  4. The solution won't have access to any external resources outside the farm.
  5. The solution won't have access to the disk nor execute unmanaged code. 
  6. The solution won't have access to resources in a different site collection. 
  7. You can deploy code from other sources(if not tested or reviewed preoperly) without fear of jeopardizing your SharePoint farm.
  8. You can deploy Webparts, List Definitions or ContentTypes even without having elevated privileges like farm admin.
  9. You can develop solutions for SharePoint Online (the cloud version),  then this would be the best way to deploying solutions to the cloud.
The downside with sandbox solutions especially with webparts are that, it only supports non-visual webparts i.e. you had to code all the controls in UI including layout through code, no drag  n drop. Feels intimidating?  Yes I too felt the same thing. So while going through some articles on sandbox solutions, I came to stumble upon an article, which was discussing about deploying visual webparts as sandbox solutions. Wow that's great!!! this was definitely something different from what Microsoft guys were preaching from. Reading further, the article provided a link to  Codeplex which could circumvent the problem of deploying Visual webparts as sandbox solutions to Sharepoint. As I was busy with the problem in hand, I didn't peek into that, may be I will look into that at a latter date.

Now coming back to what I was trying to resolve. My trivial nonvisual webpart was ready and the build went smoothly without errors. Now its time to be deploy my webpart to SharePoint; for that, I selected "Deploy" option from the Build menu. Boom!!! now errors started popping in, which I didn't get hold of what exactly they were. 

The initial error was "Error occurred in deployment step 'Retract Solution': Cannot start service SPUserCodeV4 on computer." Seems like some service which Sharepoint was expecting is down at the moment. After going through the windows services (services.msc), I came to find that the following service "Microsoft SharePoint Foundation User Code Service" wasn't running. I started it and changed its "Startup Type" to "Automatic". Coming back to VS.NET 2010, I issued the "Deploy" command. This time another error popped in.

This time the error was  "Error occurred in deployment step 'Activate Features': This feature cannot be activated at this time. The contents of the feature's solution requires the Solution Sandbox service to be running." Oh God, Sharepoint is expecting another service, which unfortunately is down. I started searching for this specific name "Solution Sandbox service" under windows service's, but couldn't find any exact or near by match. Next I started my search in Sharepoint Central Admin, where I navigated to "System settings" -> "Manage services on this server". Here in "Manage Services" page, lot many services were listed which did include the one I was looking for, i.e. the "Microsoft SharePoint Foundation Sandboxed Code Service".  After starting this service, I issued the "Deploy" command from VS.NET. Finally this time everything went well and the webpart got successfully deployed to Sharepoint site as  sandbox-ed solution. 


I was curious on why MSFT chaps disabled these services, which is so crucial to deploy sanbox-ed solution. While trying to unravel the reason behind this, I came across an MSDN article, which clearly mentioned the reason why it was so. The articles reads, these services were deliberately disabled on performance grounds. Starting these services will kick in three new processes, namely User Code Service (SPUCHostService.exe), Sandbox Worker Process (SPUCWorkerProcess.exe) and Sandbox Worker Process Proxy (SPUCWorkerProcessProxy.exe) which slightly affects server performance. So as to gain the performance advantage only they did disable these services.

Make sure that you DON'T stop or disable the above two services once you deploy a sandbox-ed solution to a sharepoint site as these services are crucial for the sandbox-ed solutions to function properly without which, it would fail.


You could view all sandbox-ed solution inside a site collection by navigating to(at your top level SharePoint site)  
  1. Site Actions - > Site Settings 
  2. Under galleries section click solutions. You should now see the Sandboxed solutions available in the solutions gallery.
Here I was talking on deploying Standard Webparts as sandboxed solutions. Sharepoint doesn't restrict itself to webparts when comming to sandboxed solutions, as you could deploy 'Event Receivers', 'Feature Receivers', 'Custom Worlflow activies' and 'Infopath Biz Logic' as well.


So the crux of using Sandbox solutions is that, you could easily port your webparts to SharePoint Cloud version (online version) with ease and moreover the site collection administrator himself\herself could deploy solutions without raising a ticket to the farm administrator.

Monday, June 6, 2011

Sorting out Issue with Windows 7 Audio

Today I was after some tweaks to get my machine for top notch performance, for which I had to go through stuff like stopping unnecessary(optional) services, taking out unwanted applications from start up etc etc. After all the tweaks and optimizations I restarted my system, everything was perfectly fine and the system booted much faster than previously, so far so good. 

I fired up windows media player to listen to my favorite tracks, boom!!! the media player was shouting, it cant find any audio device in my system. Oh God, something had went terribly wrong while doing those tweaks. So the next question was, which application or service did I accidently stop or un-installed? To make things worse, I forgot to record the tweaks I made, which I usually does, so that in worst case I could identify where exactly I might have went wrong. 

Finally after a lot of trial and error, I was able to get my audio playback ready. This time everything was on-record to avoid further pitfalls. I zeroed in where exactly I went wrong. Here are the steps I did to get my audio playback back on stage. Note, you need to have administrator privileges to get what I am about to discuss here.
  1. Open "services.msc" (Windows Services Console)
  2. Find the following services and set all of its "Startup Type" to "Automatic" and Start each service in the exact order as below.
    1. "Power"
    2. "Multimedia Class Scheduler"
    3. "Windows Audio Endpoint Builder"
    4. "Windows Audio"
That's it, the above steps worked for me, hopefully this should work for others too.

Saturday, April 23, 2011

Beyond Microsoft - Nokia Partnership

If you were watching the investing trends of venture capitalists in IT sector, most likely you would have noticed that, in recent years the trend had actually shifted more into mobile applications, which is set to grow at an exponential rate in near future. With the introduction of 3G in a bandwidth constrained country like India, which is to open up a whole lot of opportunities not just for telecom players but for the entire industry at large. Also not to mention that the purchasing power of people had grown like never before, which had started attracting international players to tap this vast opportunity. 

So mobile applications being the buzz world in and around the technology sector, industry giants like Microsoft, Google, Apple to name a few had joined the fray to get hold of the mobile application market with their platform offerings. 

Recently Microsoft made headlines in most daily's, by partnering with Nokia to get their Windows Mobile platform deployed on Nokia smart phones, by replacing Nokia's proven Symbian OS platform. I read this news twice to confirm what I read was right or not. My initial reaction was, did the people at Nokia had gone nuts to accept such an offer from Microsoft. Why don't they refine their existing Symbian OS or why not go for the proven Android platform, which would seem like a better choice from a normal persons standpoint. But later only I came to hear the real crux on what made Nokia to cut a deal with Microsoft. Did you know that, Microsoft had offered Nokia a staggering of $1billion (i.e. Rs.4,500 crore) to materialize the deal and Microsoft will be paying this  in a five year time. What crossed my mind was that, Microsoft is playing out the same strategy they had with Hotmail. 

Microsoft didn't stop there after making a deal with Nokia. See for yourself what Microsoft had announced at 2011 International CES; they are stepping out the x86 province and is reaching out to new platforms. The next version of windows is going to support System on a Chip (SoC) architecture like, ARM based processors from NVIDIA, Qualcomm and Texas Instruments. All this points to the fact that, Microsoft is keen to make their windows OS support over a large set of devices, and not just restrict to x86 machines.

So what one can infer from this deal is that, Microsoft had virtually acknowledged the fact that mobile platforms is going to be the next generation computing platform, which is going to supersede Desktop\Laptop computers for those who primarily use computers for stuff like surfing th web, mailing, office apps, movies, music, presentation, calendaring, Instant Messaging et al. 

So whats in here for developers? Definitely its a great opportunity in disguise that you could take advantage of by diversifying your skillets to cover mobile based development platform, which itself should not be limited to Windows Mobile development but to other platforms like Android and iOS (Apple). 

Before concluding there's a good news for Silverlight developers. Knowingly or unknowingly you guys now posses mobile development skills on Windows 7 Mobile platform because Microsoft is supporting Silverlight on Windows 7 Mobile platform for delivering rich UI apps.

So start updating your skill set arsenal with new skills and be ready for the mobile computing era.

Thursday, April 21, 2011

Opening Excel Files In Different Windows

Today a friend of mine rang me up to check whether, is there any way to open excel files in different windows, rather than getting the files opened in the same application window, which was excel's default behavior. My friend is having a system with dual monitor and was trying to open excel files in both the monitors, unfortunately both the files were getting open in the same excel main window, and all attempts to drag files from the main excel window to the secondary monitor didn't succeed.

I did went through the options in excel, but unfortunately no setting could be found to get this done. I thought this should not be an odd case, as this might have been faced by others too, so why not search and see if there is some solutions out there in the net. After going through a couple of solutions, I found the one which I was looking for. Some additional steps were required to get this done, which wasn't mentioned there in the solution. So I though of documenting the solution, so as to benefit others if the need arises.


I came to find two solutions for this. First one is dam simple, but a temporary solution. While the second one is what I recommend. So lets start with the simple one.
  1. Open Excel application.
  2. Drag the file you wish to open to excel application.
  3. To open the second file, open a new excel instance, i.e. open excel from start menu or by typing "excel" in start-> run dialog. (don't forget exclude the quotes while entering command in run dialog)
  4. Drag the file you wish to open to this new instance of excel application. Thats it, now you have two instances of excel application which you could drag around multiple monitors as you wish.

Now lets move on to the second solution, the one I would recommend for power users.

Assumptions: Microsoft Excel 2007 or above running on windows XP (The settings locations might be different in case of Windows 7, but the solution should work with both Vista and Win7).
  1. Open Windows explorer. (Press Win + E key combination or open "My Computer")
  2. Open "Folder Options" from "Tools-> Folder Options"
  3. Select tab "File Types"
  4. Inside "Registered File Types" search for "XLSX" under "Extensions" column (Excel file extension for formats from 2007 onwards)
  5. Make sure you had selected "XLSX" under "Extensions" column.
  6. Click "Advanced" button. A new window with the title "Edit File Type" should open up.
  7. Un-check "Browse in same window" if checked.
  8. Under "Actions" list select "Open" (The text highlighted in bold).
  9. Click "Edit" button.
  10. A new window with the title "Editing action for type: Microsoft Office Excel Worksheet" should open up.
  11. In the textbox labeled "Application used to perform action", update the text to the following. Note: Append the text /e "%1" after the excel path. Now it should look like the one below except for the path to Excel.exe
    "C:\Program Files\Microsoft Office\Office12\EXCEL.EXE" /e "%1"
  12. Uncheck the "Use  DDE" checkbox.
  13. Click "OK" button to close the window.
  14. Click "OK" button in the "Edit File Type" window.
  15. Now execute the steps from 5 to 14 by selecting "XLS" file extension.
After making all these changes close any open excel documents and try opening two excel files. Now you should see those two files opened up in two different windows.

Saturday, April 16, 2011

QR Codes

Have you ever seen something like this(like the square dotted image below) and asked yourself whats is it?
Yes, me too was in the same situation when I came to see an Ad, where a token with some black dots was used to pass out contact information. Out of curiosity I did a search on what this stuff was all about and finally got what I was looking for.


What's QR Codes all about
QR Code means Quick Response Code a two dimensional matrix bar code. The reason why they are more useful than a standard barcode is that they can store (and digitally present) much more data, including url links, geo coordinates, and text.


QR Code Videos
Here are some videos showing some creative use of QR Codes.


Generating QR Codes
If you want to generate a QR Code for yourself to showcase info like contact details, phone number or your personal site URL. Here are some free resources providing QR Code generators.

Reading QR Codes
So now we know how to create some really exciting QR Codes for yourself with details containing like contact info, phone number, personal website url, email id or even your Facebook Id et al.  Lets move on to on how to read QR Codes. If you had watched the videos, then you might have already started scanning out some QR Codes out there in the internet or street.  


Ok lets jump on and see how to read some QR Codes with your smart phones. I think nowadays smart phones are no longer the realm of rich and cosy, with Android hitting the mobile markets, the smart phones are now within common mans reach. So the basic requirement is, you need to have a smart phone with camera. Next step is to download QR Code Readers for your mobile platform. For Android users here is the most downloaded QR App.


How QR Code works
If you are the kind of person who is really passionate to know about how things work. Definitely we are on the same frequency. Ok lets find out the internals on QR Codes. So before that lets first checkout how QR Codes came into picture? 


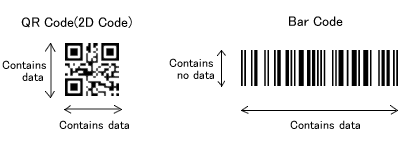
The limitations imposed by bar codes really gave way to the development of 2D Codes. Usually a bar code encodes data only in a horizontal direction that means it simply wasts space by encoding the redundant data vertically. So as to contain more data, bar codes were enlarged which complicated reading operations and increased printing costs.


The QR Code was developed by Denso Wave Corporation and released in 1994, as a means to contain more data per area than bar code does. This is a patented technology even though this is open for public use and its clearly defined and publicly available. The QR Codes also known as 2D Codes can contain data in both horizontal and vertical directions. QR Code could handle characters up to this range.


Data Capacity:
Numbers:                                    7089
Alpha numeric:                           4296
Binary:                                         2953
Kanji (Japanese characters):   1817


You can see for yourself the cost saving in using QR Codes over bar codes, as it requires just one tenth space to encode the same information as bar code does.


The other advantage with QR Codes is that it can be read from any direction that means it is omini directional or can be read from 360 degree angle. QR Code decoders does this by identifying the position the big squares located at the three corners of the QR Code.


QR Code Structure 
The following image depicts how a QR Code is to be structured. The cells colored White or Black are fixed, these are called "finder patterns" or "timing patterns" which is used by the QR decoder to help determine the orientation. The cells colored yellow are the ones which data is stored while the one in cyan is used to store error correction code and mask pattern (aka format information). 


QR Code Versions
The QR Code symbols comes in different versions ranging from Ver 1 to Ver 40. Each version has different module configuration, here module means the density of black and white dots that make up the QR Code. Version 1 had 21 modules while the present version i.e 40 which could contain 177 modules. This also provides error correction capability to retrieve data in case the symbol gets dirty or damaged. 


If you are interested to dig more about QR Codes data encoding visit the following URL (decode and try. Scratching your head to find out an online decoder? don't worry click here and paste the below QR Code symbol\image url)


.NET Developers
A good news for you folks, If you are planning to incorporate QR Code encoding\decoding functionality in your application, here is a free library worth evaluating.


So next time, if some one asks you whats that square icon with dots, definitely you could show off techie skills.

Why Use Google Chrome


I had always been a fan of Google, right from the day one I came to experience the power of Google search, I started using their Search engine and with the introduction of GMail, I was living my dream of having the best ever mail application nd that too for free of cost, with tons of features like Gigabytes of space, Keyboard Shortcuts, Mail Filtering, Tagging\Grouping and lots more. 

With Google stepping into the browser market I was bit doubtful on how it’s going to compete with the deep rooted giants like Microsoft IE, Mozilla FireFox et al. But once I installed this application I was taken by storm after experiencing its performance and robustness in terms of security and ease of use, though at first there were some hiccups which were straightened out in the later releases. So coming back to the title of this article "Why Use Google Chrome", I would like to share what the experts\hackers community had to say about Google Chrome.

Secure Browser ever built: At first glance it might look like a marketing tag line. We’ll see how Google Chrome befits for this secure ranking status. Google had announced a cash prize of $20,000 for coming out a with chrome exploit, but as on date no one had ever succeeded in bagging this prize money.  In the last two PWN2OWN contest at the CanSecWest conference, where security experts around the world compete to exploit the browser vulnerabilities of those including Chrome, Firefox, Safari, Opera and Internet Explorer. The only browser which came out unscathed was Google Chrome because of its sand-boxing model. Lets  hear what Charlie Miller(a security expert) had to say "There are bugs in Chrome but they're very hard to exploit. I have a Chrome vulnerability right now but I don't know how to exploit it. It's really hard. They've got that sandbox model that's hard to get out of. With Chrome, it's a combination of things - you can't execute on the heap, the OS protections in Windows and the Sandbox."  While browsers from Apple, Microsoft browsers drop to first shots at the hacking contest. In fact, Safari was apparently exploited in a matter of seconds. While the most impressive hack was that of  Fewer's, who used three vulnerabilities to [not only] bypass ASLR (Address Space Layout Randomization) and DEP (Data Execution Prevention), but also escape Internet Explorer's Protected Mode, which was something not seen at PWN2OWN before. Click here to read more on this vulnerability.

So What's Sandboxing: If the term sandboxing is new to you, no need to worry as this is a simple principle used in computer science to insulate un-trusted\untested code from a developer or company from accessing or altering the core system components or configurations. The sandbox typically provides a tightly-controlled set of resources for programs to run in, such as scratch space on disk and memory.  In simple terms its assigning the least privilege or just the required privilege to every process involved in executing a task without affecting the stability or integrity of the host system. 

How Chrome Sandboxing Works: Chrome implements Sandboxing by utilizing windows security model called process tokens. If you were to open up a chrome window you will find two chrome.exe listed under the Task Manager process tab even if you are browsing a single site (You will find more chrome.exe processes, if you have installed any browser plug-ins). You could also notice all processes running under the same username which you had logged in, so you might be thinking how does this policy of least privilege apply here and why these many processes? 

Traditionally browsers contain all the sites you browse into a single process; this means all web sites share the same address space. In such a scenario, if you were to visit a hijacked site installed with malware, it might exploit\access all sites opened in other tabs and using buffer overflow exploits it could even access your system resources including files on your disk and more. Also if any one of the tab crashes the entire browser will hang or come down crashing causing you to lose any unsaved data with it, this might not be something new for anyone who had been using browsers like IE and Firefox. 

So let’s explore how the chrome security model works. For this you need Process Explorer to see how the sandboxing (process tokens are assigned) works. Open up chrome and browse www.google.com Next start ProcessExplorer.exe, here you will find two chrome.exe process listed (you will find more chrome.exe processes, if you had installed any plug-ins). The chrome.exe process are laid out in a hierarchical way, where a parent chrome.exe process is listed with a child chrome.exe process as shown below.


Here what you see is chromes sandboxing model in action, which relies on protection provided by windows. The Sandbox operates at process-level granularity. Anything that needs to be sandboxed needs to live on a separate process. The minimal sandbox configuration has two processes: one that is a privileged controller known as the broker process, and the sandboxed processes known as the target process. In Chrome the broker process is called the Browser Process, while the target process is called as the Renderer process. In the above screen shot, the Browser process is the parent Chrome.exe process, while the child Chrome.exe is the target process, i.e. the Sandboxed process. The Renderer process (i.e. the target process) communicates with the Browser process (i.e. the broker process) using chrome IPC channels. The sandbox IPC channel is a low-level mechanism (different from Chromium's IPC) which is used to transparently pass on certain windows API calls from the target (Renderer process) to the broker (Browser process).

Now let’s explore the security tokens assigned to the Renderer Process, for this select the properties of the child chrome.exe and select Security tab. Here you would see all the users and groups with deny restrictions and a NULL SID which denotes a group with no members. This effectively takes out permission from the renderer process from accessing resources on your system.
         
When you key-in a URL to the chrome window, its passes on the request to Browser process through IPC channel. The Browser process then makes a request to the specified web address\url and all the data received from the webserver is passed back to the Renderer process which does the rendering of the webpage using web kit engine.

If you are interested to know more on chrome internals, here is a couple of links worth visiting.

So to conclude, sandboxing being one of the pioneer security model used by chrome to combat possible exploits. Chrome uses another feature called "Phishing Filter" to prevent users from visiting phishing sites by checking against a list of known phishing site list and warns the user about potential risk of visiting the site. The other plug-in worth installing is the "NotScript" extension that provides high degree of security by disabling scripting for non-white listed sites. If you trust a site you can white list that site, only then it will allow scripts to be executed at the browser end.


So having said this, I believe no browser as of now is as much as robust as Chrome on taking security this seriously, though IE had come up with its protected mode, but it still has a long way to go in order to catch up with chromes prowess in terms of security, performance and responsiveness.


So have a safe browsing with Google Chrome.